AWS DataSync File Share Migration: Steps and Trade-offs
Title: AWS DataSync File Share Migration: Steps and Trade-offs
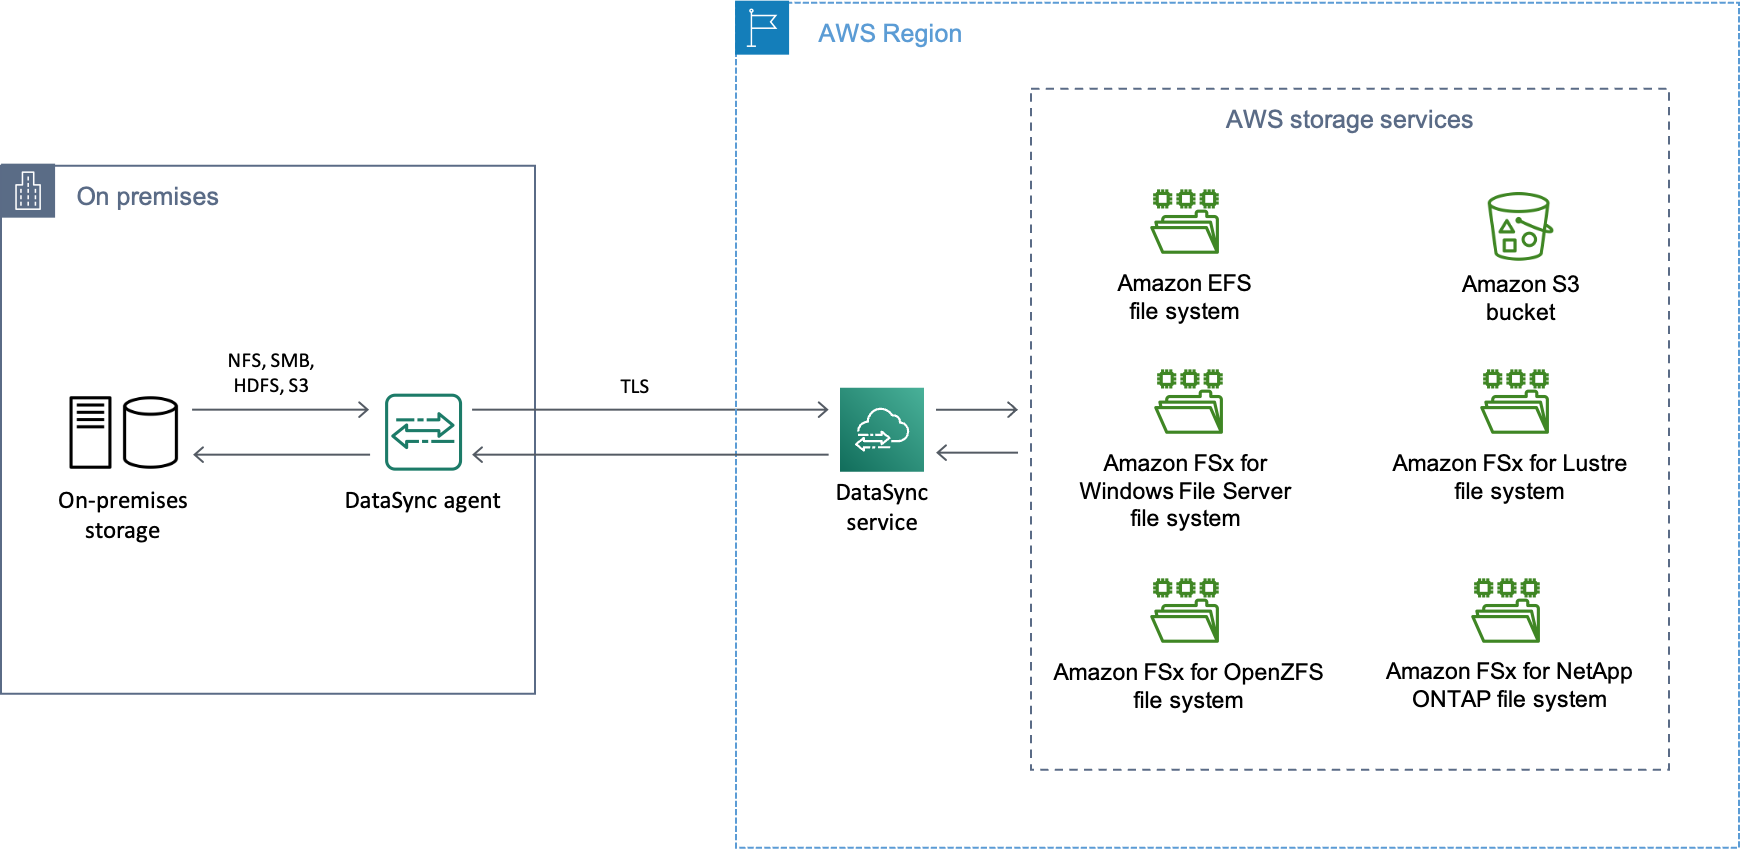
An AWS DataSync file share migration works like this: you deploy an agent next to your NFS or SMB storage, point a task at a source location and an AWS destination (S3, EFS, or FSx), run a first full copy, then keep running the same task on a schedule so each pass only moves what changed. Cutover is the last incremental run after you stop writes, so real downtime is minutes rather than the length of the full transfer. The decisions that bite you later are made before that first run: agent sizing, the destination service, the task mode, and how much you ask DataSync to verify.
This article covers the on-premises to AWS case for file data specifically. If you are moving whole servers, that is a different tool and a different plan; the same is true for relational databases.
What to check before you change anything
Do not deploy the agent first. Three things determine whether the migration is smooth or a month of surprises, and all three are cheaper to get right up front.
Measure the dataset, not just its size
Total terabytes is the number everyone quotes and the least useful one. File count is what actually governs the transfer, because DataSync prepares, transfers, and verifies per object. A share with 40 TB in a few thousand media files behaves nothing like 4 TB spread across 30 million small files.
Confirm the network paths and ports
The agent talks to two sides: your storage over standard protocols, and the DataSync service in AWS. Get the AWS side wrong and activation fails with unhelpful errors.
If you activate over the public or FIPS endpoints, the agent needs outbound internet to the service. If you want traffic to stay private, use a VPC endpoint powered by PrivateLink. <cite index="4-4">VPC endpoints keep data transferred between your agent and AWS off the public internet and remove the need for public IP addresses, and to use them you create a DataSync VPC endpoint in your chosen VPC and specify it when creating the agent.</cite>
The ports that trip people up:
- Activation. <cite index="9-1,9-2">Some options for getting the activation key require access to the agent on port 80 (HTTP); DataSync closes that port once the agent is activated, and activation keys expire in 30 minutes if unused.</cite> You can avoid opening port 80 to a browser by pulling the key from the agent's local console instead.
- VPC endpoint transfers. <cite index="11-2">Allow outbound traffic from the agent to the VPC endpoint on ports 443, 1024 to 1064, and optionally port 22, which is used for AWS support access.</cite>
- Execution endpoint capacity. <cite index="5-0">Each DataSync task uses four IP addresses for its task execution endpoints, so confirm the endpoint subnet has at least four addresses free.</cite>
Size the agent for the file count
The agent is not a fixed appliance you can ignore. <cite index="0-3">An agent is a virtual machine appliance that DataSync uses to read from and write to storage during a transfer, and there are two types: one for Basic mode tasks and one for Enhanced mode tasks.</cite> <cite index="1-4">You can deploy it on VMware ESXi, Linux KVM, Microsoft Hyper-V, or as an Amazon EC2 instance.</cite>
RAM is the resource that scales with your dataset. <cite index="10-3,10-4">A DataSync agent needs at least four CPU cores and 80 GB of available disk space, with 32 GB of RAM for task executions working with up to 20 million files, objects, or directories, and 64 GB of RAM for more than 20 million.</cite> If your file count runs to tens of millions, provision the larger agent from the start rather than watching a task stall.
Deploy the agent as close to the storage as possible. <cite index="1-4">To minimize network latency, deploy the agent as close as possible to the storage system it needs to access, ideally on the same local network.</cite>
Deploy and activate the agent
Download the image from the DataSync console for your hypervisor, or launch it on EC2 if the source is already in AWS. Give it a route to the storage over NFS or SMB, and a route to your chosen service endpoint.
For an NFS source, the export has to let the agent in with enough rights. <cite index="6-0">If NFS is a destination, DataSync needs root access to write and set ownership, permissions, and other metadata, which you allow with the no_root_squash option; a read path can be configured read-only, a write path read-write.</cite> For SMB, create a service account that can read the share and its metadata.
Activate the agent, then create your locations and task from the CLI so the configuration is reviewable and repeatable:
aws datasync create-task \
  --source-location-arn "arn:aws:datasync:eu-west-1:111122223333:location/loc-source" \
  --destination-location-arn "arn:aws:datasync:eu-west-1:111122223333:location/loc-dest" \
  --task-mode "ENHANCED" \
  --name "fileserver-to-s3"
Configuring the task: the options that decide the outcome
This is where an AWS DataSync file share migration is won or lost. The defaults are reasonable but not always what you want.
Task mode: Basic or Enhanced
<cite index="6-1">Basic mode is the default: it transfers between AWS storage and all other supported locations, but it is subject to quotas on the number of files, objects, and directories in a dataset, and it sequentially prepares, transfers, and verifies data, making it slower than Enhanced mode for most workloads.</cite>
There is a catch worth knowing before you commit: the two modes do not support the same verification behaviour, covered below.
| Basic mode | Enhanced mode | |
|---|---|---|
| File count | Subject to per-task quotas | Built for very large datasets |
| Ordering | Sequential prepare, transfer, verify | Parallelised, faster on most workloads |
| End-of-transfer full sync check | Supported (default) | Not currently supported |
| Logs | You specify a CloudWatch log group | Auto-logs to /aws/datasync |
<cite index="7-1">With Enhanced mode tasks you do not specify a CloudWatch log group; DataSync sends logs to a group named /aws/datasync and creates it if it does not exist.</cite>
Verification: the trade-off between confidence and time
DataSync always checksums data in flight. The choice is how much extra it checks at the end. <cite index="0-5">DataSync always performs integrity checks during a transfer, and at the end it can perform additional checks on just the transferred data or the entire dataset in both locations.</cite>
<cite index="6-4">POINT_IN_TIME_CONSISTENT checks the entire source and destination at the end to verify both are fully synchronised; it is the default for Basic mode tasks and is not currently supported with Enhanced mode. NONE performs integrity checks only during the transfer with no additional end verification.</cite> Verifying the entire dataset on a 30-million-file share adds real hours. "Verify only transferred data" is the recommended middle ground for incremental runs, because rescanning the whole destination on every scheduled pass buys you little once the first full copy has passed a complete check.
Metadata: know what survives the trip
If users and applications will keep hitting these files, metadata fidelity is not optional. What is preserved depends on the protocol. <cite index="16-2">Using NFS, DataSync copies file and folder timestamps and POSIX permissions including user ID, group ID, and permissions; using SMB, it copies timestamps, ownership, and ACLs.</cite>
Going to S3 changes the model. <cite index="16-2">When copying to Amazon S3, DataSync converts each file to a single S3 object in a 1:1 relationship and preserves POSIX metadata from NFS or HDFS as S3 object metadata.</cite> <cite index="16-2">When files or folders are copied to S3 there is a one-to-one relationship between a file and an object, and file and folder timestamps and POSIX permissions are stored in S3 user metadata; when DataSync copies those objects back to an NFS server the file metadata is restored.</cite> That round trip matters if S3 is an interim stop rather than the final home.
Bandwidth and filters
DataSync is fast enough to saturate your link. <cite index="14-1">A single DataSync task can fully utilise a 10 Gbps network link between your on-premises environment and AWS.</cite> That is exactly what you do not want during business hours. <cite index="15-0">You can schedule the migration to run during off-hours or limit the network bandwidth DataSync uses with the built-in bandwidth throttle.</cite> <cite index="10-0">Set the throttle in MiB/s per task</cite>, and use include and exclude filters to leave behind scratch directories, caches, and anything you have already decided to abandon.
Cutover: turn the full copy into a short incremental
The point of DataSync for a migration is that the expensive part happens while the old system is still live. <cite index="14-4">DataSync has a built-in scheduler so you can periodically run a transfer task to detect and copy changes from your source to the destination without writing your own scripts.</cite> All traffic is encrypted end to end. <cite index="0-1">Data moving into AWS is encrypted using Transport Layer Security.</cite>
A workable sequence:
- Run the first full transfer. Expect it to take as long as your data volume and throttle allow, and let it complete a real verification pass.
- Keep the same task on a schedule. Each run is incremental and only moves changed files, so passes get progressively shorter.
- When the deltas are small and predictable, pick a cutover window.
- Stop writes to the source (quiesce the application or make the share read-only).
- Run one final task execution. Because only the last changes remain, this run is short.
- Repoint clients at the AWS destination and resume writes.
The downtime your users feel is steps 4 to 6, not the days of bulk transfer. Getting there cleanly is the same discipline our team applies on any on-premises to cloud migration: make the cutover boring by front-loading everything that can go wrong.
The costs you inherit later
Every choice above has a bill attached down the line.
- Destination service. S3 is cheap and durable but is object storage, not a file system; if the application genuinely needs SMB or NFS semantics, FSx or EFS is the honest answer, and paying for a file system you did not need is a recurring cost, not a one-off.
- Cross-AZ traffic. <cite index="1-3">To avoid inter-Availability Zone data transfer charges, deploy the agent so it does not require traffic between AZs; for self-managed file systems, deploy in the AZ where the file system resides.</cite>
- The forgotten schedule. A scheduled task left running after cutover keeps costing you and can overwrite data on the new primary. Disable it once the source is retired.
- Metadata mismatch. If you land in S3 planning to serve files later, verify the metadata round trip early. Discovering after cutover that permissions did not survive is an expensive afternoon.
If S3 is the destination because the data is headed for analytics rather than back to a file server, the migration is really the first stage of a pipeline, and it is worth designing the landing layout with that in mind. That is the boundary where storage migration meets data engineering and pipelines.
Frequently asked questions
Do I always need a DataSync agent to migrate file shares?
For on-premises NFS or SMB storage, yes. <cite index="0-2">When transferring between AWS storage services in the same account, whether in the same Region or across Regions in the same partition, no agent is required.</cite> Any transfer that touches your own datacentre needs an agent deployed next to that storage.
Should I use Basic or Enhanced task mode?
For an on-premises NFS or SMB share going to S3, Enhanced mode is generally the faster choice. <cite index="6-1">Basic mode is subject to quotas on the number of files, objects, and directories, and prepares, transfers, and verifies sequentially, which makes it slower for most workloads.</cite> The one behavioural difference to plan around is that Enhanced mode does not support the end-of-transfer full-dataset consistency check that Basic mode uses by default.
How do I keep DataSync off the public internet?
Use a VPC endpoint. <cite index="4-4">VPC endpoints, backed by PrivateLink, keep data transferred between your agent and AWS off the public internet and remove the need for public IP addresses; you create a DataSync endpoint in your VPC and reference it when creating the agent.</cite> Remember the agent still needs outbound access to that endpoint on the required ports, and one short-lived exception on port 80 during activation.
How much verification should I turn on?
DataSync checksums everything in transit regardless. Add a full end-of-transfer verification on the first complete copy so you have a clean baseline, then drop to verifying only transferred data on scheduled incremental runs. <cite index="0-5">At the end of a transfer DataSync can check just the transferred data or the entire dataset in both locations,</cite> and rescanning the whole destination every pass adds hours without adding much assurance once the baseline is sound.
Will file permissions and timestamps survive the move?
Mostly, and the detail depends on protocol and destination. <cite index="16-2">Over NFS, DataSync copies timestamps and POSIX permissions including UID, GID, and permissions; over SMB it copies timestamps, ownership, and ACLs.</cite> Landing in S3 stores that information as object user metadata rather than native file permissions, so if the files will be served back through a file interface, test the round trip before you commit to the cutover.